Tuesday, July 23, 2013

A Cheap (but Fabulous) Luau Party

Beautiful Chelsea
So once upon a time I lived in London, England, and lived with this awesome girl named Sara. Fast forward almost 10 years later, Sara and I are now 10 hours a part and living totally two different lives, but thanks to Facebook we're still able to remain close.

Sara recently contacted for ideas for her open house. I asked her what theme she had in mind, and she said something "easy breezy,"  because she was going to make sangria (yummy)! I originally went down the path of a sangria and tapas party, but after talking to Sara it was obvious she wanted something more Hawaiian. (I should have listened better the first time; she did say easy breezy - lol).

Since I already did the leg work for a Sangria and Tapas Party, I will share that blog soon! ;) Gives you something to look forward. 

Thankfully, I recently hosted a baby shower for my wonderful neighbor Chelsea. Chelsea will be having her second child but first daughter. Chelsea's awesome mom and step-dad graciously offered their pizza joint, Knight's Pizza, as the location for the baby shower. Doug and Cathy spent a lot of time giving their pizza place its own unique character, so I decided to take cue from their interior design skills and throw a Luau Baby Shower (with an emphasis on pink flamingos to bring in the pink of a new baby girl).

*There are a lot of elements that I used at the Luau Baby Shower that Sara could use for her open house. 

A Luau Them is Perfect for a Baby Shower - True Blue Style Event Planning


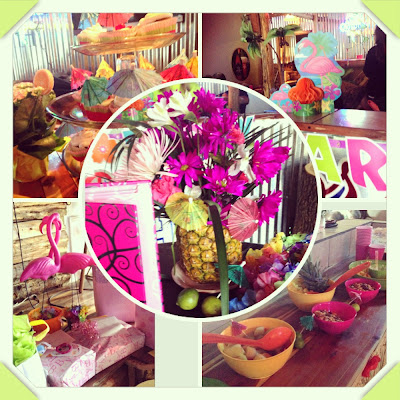
Luau Decorations

The decorations were easy because we had the baby shower in July and luau decorations were plentiful. I bought most of my decorations from Dollar Tree and Party City. There are many different ways one can throw a luau party, but since I was hosting a coed baby shower, I decided to throw a kitchy luau party. 

Party Decorations I Used: (*next to items that I see easily being used for Sara)
  • Key Limes* grouped in small numbers and strategically placed on the food table and other areas of the party make for a great design element. $6.79 from Kroger.
  • Vintage Brown Grass Skirt Table Coverings with Multi Colored Flowers* that can be used on the main food table and would look great when paired with wooden serving dishes. $5.99 at Party City.
  • Hibiscus Flower Cutouts from Dollar Tree were used under flower arrangements and can be used on food table that can make certain dishes stand out. Two packs for $2.
  • Hibiscus Wind Catchers from Dollar Tree that were used on either side of the dessert table to set it off. Two for $2.
  • Leis* that we used as added bits of color around the party and for guests to wear, but I can see Sara using them to wrap around the bottom of hurricane candle holders that you can buy $1 at Dollar Tree. I bought 10 leis from Party City for $1.49 each totaling $14.90.
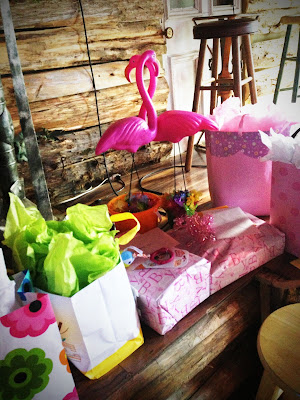
  • Plastic Pink Flamingos* were used to in sand buckets to decorate the gift area but could be used in potted plants at the open house or used in a fun photo booth. $19.99 for two from Walmart.
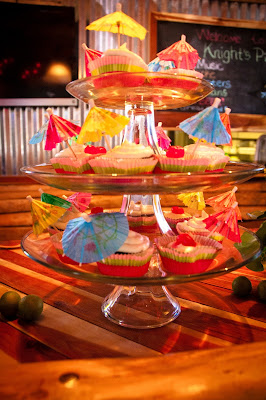
  • Tiki Umbrellas* can be used to decorate anything from cupcakes, to floral arrangements  to food, to a lamp shades or wreaths. Two boxes of 20ct. Cocktail Umbrella Picks from Party City for $1.98.
  • We also used a lot of luau party decorations Cathy and I had on hand, i.e. tiki bar sign, luau party sign, Hawaiian foot tent, etc.


Decorating for a Luau Party - True Blue Style Event Planning

Tiki Bar Sign for Luau Party - True Blue Style Event Planning

Key limes are a cheap decoration for a Luau Party - True Blue Style Event Planning
Key lime decorations on the food buffet table.

Focus on Pink when using Luau Party Decorations for a Baby Shower - True Blue Style Event PlanningPink Flamingos are the Perfect Decoration for a Luau Party - True Blue Style Event Planning

Dollar Tree Decorations for Luau Baby Shower - True Blue Style Event Planning
Hibiscus Wind Catchers from Dollar Tree decorating dessert station.

Luau Centerpieces:

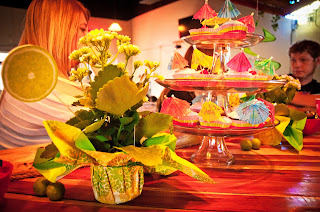
I wanted to create a really cool centerpiece to to sit at the table that not only centered the room but was the first sight anyone saw when walking into Knight's Pizza. On the table were extra leis for guests to wear and mom advice cards for people to fill out. So, I decided to use a pineapple instead of flower vase

To create a pineapple flower centerpiece you need the following:
  • Pineapple - $3.79 from KrogerCut off the top of the pineapple and core the pineapple with a long and sharp knife.
    You have to cut a hole out of the bottom where the pineapple is attached.
    * I then cut up the inside of the pineapple and served it at the party, and used the top of the pineapple to garnish the bowl of the fruit.
  • Green Floral Foam - $1 from Dollar TreeShave a piece of green floral foam to fit inside the pineapple, and then soak it with water before putting it in the pineapple.
  • Floral Arrangement - I bought mine for $10 from KrogerIndividually place each flower into the foam to create the arrangement. Fill in any holes with leftover cocktail tiki umbrellas.
    *Since there is a hole, I did have the centerpiece sit on a small coffee saucer.
Luau Pineapple Flower Centerpiece - True Blue Style Event Planning

Remember in my last post, Construction Party - Happy 2nd Birthday Von, how I talked about Kroger being my favorite place to buy flowers because you can usually workout a deal? Well, I was able to get four additional small flower arrangements marked down to a $1 piece, because I asked if I could get a discount if I bought the full price bouquet for the pineapple centerpiece. 

Luckily, they were trying to get rid of the smaller flower arrangement, so they said I could have $2 off for each one. So for $4 I had four additional flower arraignments  Motto of this story: You never know unless you ask! :)

Tropical flower arrangements from Kroger - True Blue Style Event Planning
A $2 Centerpiece for tables at a Luau Party - True Blue Style Event Planning
Underneath this flower is the Hibiscus Flower Cutout

Total Luau Decorations Costs: $72.44

Luau Food

For this coed shower we stuck to basic food:
  • Pizza - FREE thanks to Knight's Pizza
  • Fruit - $6 for already cut up fruit from Kroger (put it on a skewer for a more appetizer feel)
  • Chips and Dip - $5 - I just had to spend a $1 on the dip because I had all the ingredients in my refrigerator.
  • Nuts - $2 from Kroger
  • Cupcakes -$12 for all the ingredients I needed
Nathan :)
I would say WITHOUT a DOUBT the pizza was the third best thing about this luau baby shower (after Chelsea's preggo tummy and her baby boy Nathan). 

The main course was Knight's Pizza's slim slices of Hawaiian Knight and Southern Knight - best pizza I've had in Middle Tennessee.

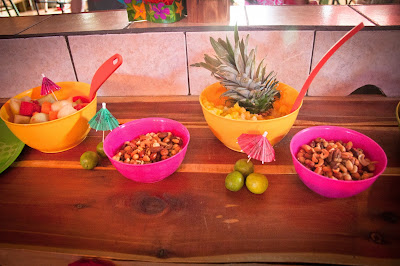
With the pizza we served fresh cut fruit, mixed nuts and an AWESOME Hawaiian Cheese Dip. The dip was a big hit. We served it with regular and barbecue chips, but it could be served with wheat thins or baguettes. 


Best Pizza in Nashville - Knight's Pizza - True Blue Style Event Planning

Luau Party Menu - True Blue Style Event Planning

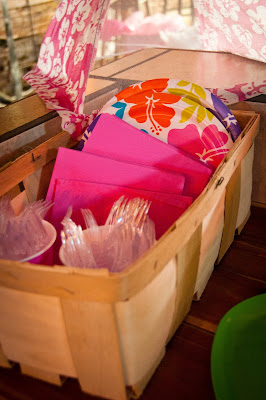
Colorful serving dishes for Luau Party - True Blue Style Event Planning


Dessert:

You can't have a luau without pineapple upside cake, but since I LOVE cupcakes I found this great recipe for Pineapple Upside Down Cupcakes. The only difference between the cupcakes I made and the recipe is that I chose to put the cherry on top instead of inside of it.
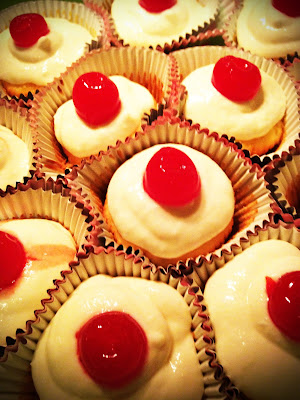

Luau Party Dessert - Pineapple Upside Down Cupcakes - True Blue Style Event Planning
When making these cupcakes follow the recipe and make sure to have as much liquid as possible drained from the pineapple you add to the frosting mix.
Hawaiian Cupcakes for Luau Party - True Blue Style Event Planning
In case anyone didn't like pineapple upside down cupcakes, I also made regular chocolate cupcakes with vanilla frosting.

Total Luau Food Costs: $25


Luau Baby Shower Activities

Another key to the success of this coed baby shower was the non-girly baby shower games and fun activities that all ages could do. 

Activities:
  • Mommy advice cards that people filled out put in a photo album for Chelsea to keep - $4.64 from Walmart and photo album to hold cards - $6 from Walmart
  • Paper butterfly decorating for the kids and final products were hung up in baby Emma's room - FREE - Chelsea provided for the kids to do.
  • Karaoke - FREE - provided by Knight's Pizza

Games:
  • The dirty diaper / guess the melted chocolate game - Diapers FREE (personal stash) chocolate bars $6 (We bought the bag of mini candy and used the rest in bowl on the dessert table.)
  • Beer chugging out of a baby bottle contest - six 6 oz. baby bottles for $10 from Walmart and beer was free courtesy of Knight's Pizza.
Game Giveaways:
  • One $15 gift card to McDonald's
  • One Knight's Specialty Pizza given by Doug and Cathy - FREE

Luau Baby Shower Costs: $41.64
Coed Baby Shower Games - True Blue Style Event Planning
Karaoke time with Nathan and Doug.
This baby shower was a hit! The simple but yummy food, paired with the great coed friendly and kid friendly games and activities made everyone not want to leave. The total cost was pretty friendly on my pocket too. I also think there are aspects of this baby shower that Sara can use for her open house and anyone else can use for their Luau Party.

Total Luau Party (Baby Shower) Costs: $139.08 


Saturday, July 20, 2013

Construction Party - Happy 2nd Birthday Von!

Birthday boy at his Construction Party
The Birthday Boy
Sugar and spice and everything nice is the perfect way to sum up all the wonderful parties I've planned for my three daughters over the past six years. While, I thoroughly enjoy pink, sparkles, ruffles, princess crowns and tutus, I can't tell you how excited I was to plan my son's 2nd birthday.

I was tossing around theme idea's for Von's 2nd birthday, and I asked my husband what he thought about a puppy party. Rick quickly responded, "Enough with the cute!" So, what is the opposite of cute?

DIRT

Von's 2nd Birthday Party was a Digger Party / Construction Party. Since I am extremely budget conscious, I spent a lot of time looking for the lowest price party items and cheap, resourceful ideas.

construction birthday party ideas


Construction Party Decor:

Construction Party Centerpiece
I have to have a centerpiece at every party I throw. I don't know why. I love to find creative ways to showcase flowers, and my go to flower store is Kroger. Kroger has quite a variety and really good deals. I have also found that if you actually talk to the Kroger florist, you can usually work out a deal or a discount. 

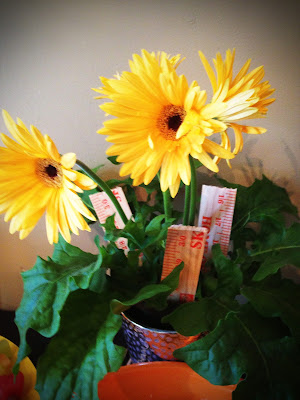
For Von's 2nd Construction Party, I know I wanted a hardy flower in yellow or orange. I was in luck that Kroger had these potted Gerber daisies on sale for $2. I had previously bought the silver flower vase from Goodwill for $1, so I just re-potted the plant in my Goodwill buy. 

To give the center piece more of a "construction party" feel, I had my husband break an Old Time Yard Stick from Home Depot into pieces to stick among the flowers.


Construction Party Center Piece Total Cost: $3.86


Construction Birthday Party Decorations


Construction Birthday Party Dump TruckConstruction Party Table Decorations
Construction Party Construction Signs

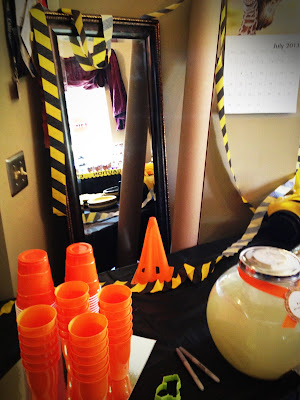
What is a construction party without caution tape?

I did a lot of searching for caution tape on the Internet, and I found the best deal at Birthday Express. The caution tape came in 10 feet rolls, so I bought 3 at $2.50 a piece. I then found caution tape streamers at WalMart and bought 3 rolls at $1. The caution tape and streamers set off the black plastic tablecloths - 3 at $2 a piece at WalMart.

I also bought 3 silver cardboard cake platters at $1 a piece from WalMart to set off the dirt pudding and cups at the drink station. I also used orange ribbon I had on hand to help decorate the drink dispenser, and I can't forget the orange cones, which I already had because I coach soccer. I also used my son's dump truck to hold the silverware.

I also bought 2 sets of construction signs (4 in a pack) and one set of 8 construction cookie cutters, both from Birthday Express, to use as decoration. The signs were $3 a set, and the cookie cutters were $2.


Total Construction Birthday Decorations Cost: $37.31 (includes $5.95 shipping and handling and center piece costs)


Construction Party Food:

For some reason I also feel the need to feed people at every party. I think I can chalk up my desire to force feed my guests to my amazing grandmother, Alice. It didn't matter if you arrived at grandma's house at 11 p.m., 3 a.m., or 2 p.m., grandma ALWAYS had a hot meal or an amazing dessert ready for you to eat. So at Von's party I made sure to have a spread.

Construction Party Menu:
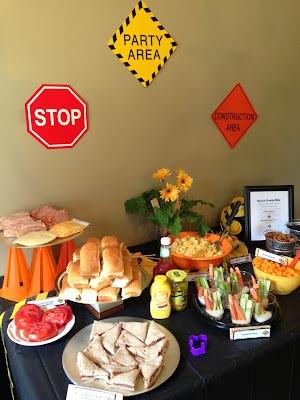
  • Build Your Own Sandwich Bar with Peanut Butter and Jelly Sandwiches
  • Jack Hammers (celery, carrots and ranch dressing)
  • Sprocket Mac'n'Cheese (I made ahead in the crock pot.  I used this crock pot mac'n'cheese recipe, but just substitute wheel macaroni)
  • Beams (fruit kabobs)
  • Wrecking Balls (cheese balls)
  • Spare Parts Mix (Boulders - raisins, Reese Building Pieces - Reese's Pieces, Nuts and Bolts - pretzels)
  • Motor Oil (sweet tea) and Fuel (lemonade)
  • Fill Dirt (dirt pudding)
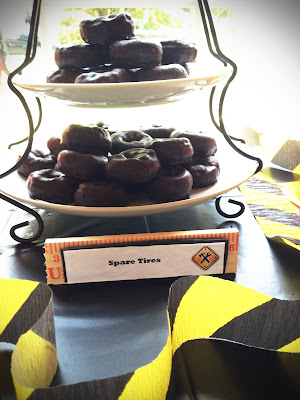
  • Spare Tires (mini chocolate doughnuts)
  • Cupcakes

Build Your Own Sandwich Bar for Construction PartyCarrots, Celery and Ranch for Construction Birthday Party

Crock pot Macaroni and Cheese for Construction Party
Creative Menu for Construction Birthday Party
Clever Drinks for Construction Birthday Party
Chocolate Doughnuts are Spare Tires at Construction Birthday Party
Dirt Pudding is Fill Dirt at Construction Birthday Party
Took Cupcake Toppers for Construction Party
I bought these awesome tool cupcake toppers off of Ebay. They were $1.79 for a set of 12 cupcake toppers. I bought 4 sets for the 48 cupcakes I was making.

Total Cupcake Topper Cost: $10.65 (paid $3.49 for shipping and handling)

Construction Party Activities:

While the birthday boy was only turning 2, we had a lot of kids ranging from 1 to 8-years-old. So, I wanted an activity everyone would have fun with. We already had a sandbox, so we brought all Von's digger toys for the kids to make a mess. It was a huge success; we just warned parents not to bring their kiddos in their good clothes.

We were also going to bring in potting soil on a tarp for the kids to play in, but it had rained a week straight before the party - leaving standing water in most of our yard. Our thought was that we could reuse the potting soil in our flower beds, so it was going to be a resourceful activity.

Construction Party Favors:

I get really excited about putting together party favors. I know I wanted the kids to each have construction hats (I got 24 construction hat from Oriental Trading for $12), but I didn't know what else. Then I remembered the neat tool aprons Home Depot gives to the kids during their kids workshops. So, I contacted our local Home Depot and offered to pay for 15 kids workshop aprons. Much to my delight, Home Depot not only donated the aprons to Von's 2nd birthday party, but they also donated enough of their latest workshop projects for every kid. Thanks to the Home Depot in Madison, Tenn., every kid at the party was ecstatic to take home a Despicable Me 2 car to make with their parents.


Construction Hats and Tool Aprons as Party Favors

I also decided to fill the pockets of the apron with even more goodies. So, I bought tool erasers for the big kids (2 sets of 24 for $5.25 each) and tool box bath squirts for the little kids (3 sets of 12 for $6 each). 

Total Construction Party Favor Cost: $45.49 (I paid $4.99 in shipping and handling)


TOTAL COSTS


Kids playing at construction birthday party


So for under $100 (not including food - I would say $150 including all food), I put on a fantastic Construction Birthday Party that made my 2-year-old son, who refuses to speak, say WOW when he saw the final product. 

I would argue with anyone if they said we didn't accomplish a white collar party on a blue collar budget! The trick is doing everything yourself and having tons of help!


Having fun at construction birthday party
The birthday boy playing with his gifts!


Construction Party TOTAL: $93.45 (not including food)


Tuesday, July 9, 2013

True Blue Style - Take 2

(Me Now)
I started True Blue Style in 2010 because I am creative person who, at the time, was being smothered by a toxic work environment that didn't pay very well. I needed a creative outlet, and since I was broke, more often than not, I decided I was going to start making those overpriced DIY projects for 75% less than the store price.

The blog started out strong, at least I think it did. I created a Fabric Embellished T-Shirt, a Button Scarflet, Jersey Flower Headbands for my daughters and even shared a recipe for left-over mashed potatoes

When concentrating on True Blue Style, I was focusing on being happy and not on the negativity surrounding my job. Do you know what happened next? I got a new job - an AMAZING job - all due to God and the power of positive thinking. I started the blog in January, and by February I was being offered a new job.

(L to R: Aricka, Von, Kaylee and Rily)
I now work in health care digital marketing and have the best boss and co-workers. The only negative is my hours are now longer and my commute is longer, so I stopped writing True Blue Style. Then God decided I wasn't blessed enough. In October 2010, Rick and I found out we were pregnant with our 4th child and first son - Von! (Insert Praise Music, because I was starting to think my body prohibited the male anatomy from growing inside me.)

Three years have gone by since my last True Blue Style post, but recently the creative bug has bitten me again. This time the culprit is the love/hate relationship I've developed with Pinterest. I love to hate all the creative, great ideas that I won't ever do or can't afford (who's with me?) There is even a whole section for DIY projects; there needs to be a 12-step program for Pinterest addicts like myself. 

(FYI - I don't hate Pinterest. I don't hate anything. So one day when you read this, Kaylee, Aricka, Rily or Von, I know we don't hate anything - we only practice love.)

So, as I am contemplating bringing back True Blue Style, I remember the blessing of the new job three years ago, which I 100% believe was because of my focus on the positive and my release of worry, stress to God. I started celebrating and trusting.

So this time around I want True Blue Style to be about celebrating. Too many times we let life slide right past us with out celebrating God's blessings. So, follow me as I put my creative skills to the test and plan celebrations (a.k.a party planning) on a budget. Remember - I still have 4 kids, and money doesn't grow on trees. True Blue Style is what I call celebrating God with white collar parties on a blue collar budget!

Saturday, January 16, 2010

Chain Necklace Revamp

I have this beautiful gold (not real gold) modern chain necklace. Jamie, one of my best friends, gave it to me when I was a bridesmaid in her wedding.


I love the necklace, but I don't wear it that often because it is a little too dressy for me. I wear jeans pretty much seven days a week, so I decided to make my beautiful bridesmade necklace into a casual accessorie.

Here is the necklace before I added anything to it.


Next, I cut out one strip of a white faux fur fabric and intertwined it through the hoops/chains. I hot glued both ends of the fabric to itself on the backside.


The result:


Friday, January 15, 2010

Large Jeweled Plaque Necklace


This necklace is my favorite piece of jewelry I have made so far. My best friend Lauren's unique jewelry collection and my husband's nature photography inspired this necklace.


First I took a piece of paper towel to make a pattern. I drew the neckline I wanted by tracing a butter bowel.
Then I used a baby food jar to create the scalloped look.


I then cut out the paper towel pattern and pinned it to a piece of felt folded in two. I cut out the felt pattern, which left me with the a front and back.


Next, spray paint the front felt with your choice of shimmer color. I used Krylon Glitter Spray. While the felt is drying, figure out how you want to arrange your jewels on the paper towel pattern.


When you are ready to sew, start with your center stone and hand sew it on to the front piece of the felt. Then sew your smaller beads around your stone. Due this with each stone, working your way to the outer-edges.


When your done it will look like this. Don't worry about it being perfect. It is the imperfections that make it unique and beautiful.


Next, take the back piece of felt and hot glue two pieces of ribbon.


I messed up on this part. I would recommend gluing the ribbons straight up and down - not at an angle. I also recommend gluing the ribbon just a little closer to the center. *I am going to fix mine, and I will add a picture on Saturday.


After you attach the ribbon hot glue the back piece of felt to the front piece of felt. The ribbon should be sandwiched in between.


This is a picture with the flash. In real life, it is not that shiny!